
Search
Latest topics


HCbatchGUI user guide ~ Batch process video and audio.
Page 1 of 1

HCbatchGUI user guide ~ Batch process video and audio.
![]() Admin Thu Dec 17, 2009 9:32 pm
Admin Thu Dec 17, 2009 9:32 pm
This Guide will show you how to process multiple avs files to dvd ready video and audio using HCbatchGUI. HCbatchGUI is a frontend GUI that uses HCenc to process video, batchDGpulldown, ssrc for audio resampling, and Aften for audio encoding. HCbatchGUI is still in early development. You can follow its development by clicking here
Tools required
HCbatchGUI ~ Found on the HCenc download page in the middle of the page under Other Info. Alternately you can go directly to the download page http://sourceforge.net/projects/hcbatchgui
Avisynth ~ Used to frameserve your avi file to HCbatchGUI
One note. You will get errors if the source directory had parentheses ( ) in the directory name.
i.e. C:\ whatever (stuff)\notgood\
The parentheses will cause the batch to not want to start right. It's okay to have parentheses in the filenames just not the directory name. Make sure you dont put any special characters in your directory names.
I created a tutorial video for working with HCbatchGUI. If you prefer a more traditional guide then it is below the tutorial video.
http://www.fileden.com/files/2009/4/1/2388062/2C40854D_Papafreebird-HCbatchGUITutorial248.flv
First if you installed the app to any directory other than the default then you must go to the setup tab and change to the directory you installed the app.
Step one open your avi file(s) in gspot taking note of the aspect ratio (16:9 widescreen or 4:3 fullscreen) ,the Fps (frames per second), and the audio rate.

\\\\\\\\\\\\\\\\\\\\\\\\\\\\\\\\\\\\\\\\\\\\\\\\\\\\\\\\\\\\\\\\\\\\\\\\\\\\\\\\\\\\\\\\\\\\\\\\\\\\\\\\\\\\\\\\\\\\\\\\\\\\\\\\\\\\\\\\\\\\
As of verion 13.0 you can have HCbatchGUI create your avisynth script for you. If you want to create your own scripts thats okay to. HCbatchGUI will happily accept any avs file you create yourself.
\\\\\\\\\\\\\\\\\\\\\\\\\\\\\\\\\\\\\\\\\\\\\\\\\\\\\\\\\\\\\\\\\\\\\\\\\\\\\\\\\\\\\\\\\\\\\\\\\\\\\\\\\\\\\\\\\\\\\\\\\\\\\\\\\\\\\\\\\\\\
Open the Videohelp.com bitrate calculator. Put in the video length ( if more than one video then add up the time and put that figure into the calculator) and set the audio rate to what you will encode audio at (224 kbps is good for 2 channel audio). You now have your average bitrate to encode to (it is a good idea to use a slightly lower~like 25kbs less~ rate than calculated to allow for authoring overhead).

You are now ready to process the video and audio using HCbatchGUI.
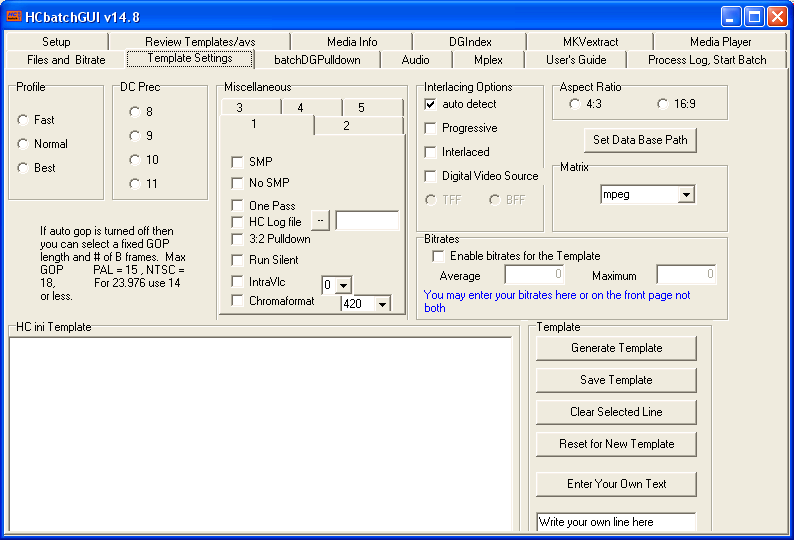
First you need to set up a template for the encode. As of v13.1 the GUI has been updated so that you don't have to worry about duplicate or conflicting entries.
You can reuse the templates over and over. After you have created a few basic templates you should never have to do anything on this tab again. I personally use the same 4 templates over and over.
The most important settings for you to check are
Profile (I suggest best),
dc prec (9 is good for most),
autogop ( If unsure what to set leave it at default 12),
auto detect (for interlacing detection) ,
aspect ratio,
Matrix (i suggest mpeg).
SMP turns on MultiProcessor settings. Allows you to take advantage of multithreaded/cored processors. If you don't have a multicore processor then check NOSMP.
You can also save your bitrates to the template however I suggest to leave that line blank so that you can use this basic template for other projects with the same specs).
When you have finished making all your selections press "Generate Template"
You should now see your template pop up in the box below.
All that is left to do now is click "Save Template".
Next go to the first page.
Set your source directory (where your avs files are),
Target directory (where you will save your m2v video files),
And bitrate (if you didn't add that to the template).
If you didn't create your own avisynth script files then you must now choose your destination size (352x480 etc...) and click "Generate Avisynth Script". If you want to compensate for overscan you must first click the appropriate overscan box then choose your destination size (352x480 etc...) and click "Generate Avisynth Script". You can also add the Convolution3D video noise filter here. If you wish to add convolution3d you must check the appropriate box (progressive, interlaced TFF, interlaced BFF) first then make your size settings and generate your script.
Then click either "Open Template" (if you entered the bitrate on the front page) or "Open Template with Bitrates in INI File" (if you added the bitrate to your template).

Now if you want to do a pal to ntsc conversion you can go to the batchDGpulldown page. This is a pretty easy setting as all there is to set is the directory you want to save the converted files to and then select the fps conversion button ( in this case 25.00 --> 29.97).

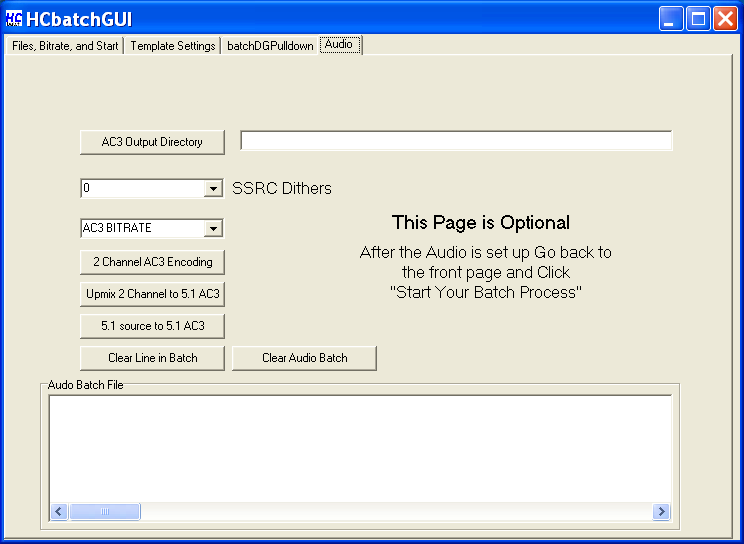
Finally you need to set up the audio. Your AC3 output directory is already set to the same directory that your m2v video files will be saved to although you can change this to any directory you like. Next add dithers if needed (leave at zero if unsure). Your sampling rate will be resampled to 48k by ssrc for you automatically. Next select your AC3 bitrate. Next select whether this will be a 2 channel encode, Upmix from 2 channel to 5.1 channel, or a 5.1 channel encode. Finally all that is left is to go to the last page (Process log/Start process) and press the "Start Your Batch Process" button.
Your files will now be processed by HCenc, Wavi, ssrc, and aften. Throughout the process you will see your progress in the log window. When finished your log window will say exit. You can then author the encoded files to dvd with your favorite dvd authoring program. A good freeware authoring app is guifordvdauthor.
Tools required
HCbatchGUI ~ Found on the HCenc download page in the middle of the page under Other Info. Alternately you can go directly to the download page http://sourceforge.net/projects/hcbatchgui
Avisynth ~ Used to frameserve your avi file to HCbatchGUI
One note. You will get errors if the source directory had parentheses ( ) in the directory name.
i.e. C:\ whatever (stuff)\notgood\
The parentheses will cause the batch to not want to start right. It's okay to have parentheses in the filenames just not the directory name. Make sure you dont put any special characters in your directory names.
I created a tutorial video for working with HCbatchGUI. If you prefer a more traditional guide then it is below the tutorial video.
http://www.fileden.com/files/2009/4/1/2388062/2C40854D_Papafreebird-HCbatchGUITutorial248.flv
First if you installed the app to any directory other than the default then you must go to the setup tab and change to the directory you installed the app.
Step one open your avi file(s) in gspot taking note of the aspect ratio (16:9 widescreen or 4:3 fullscreen) ,the Fps (frames per second), and the audio rate.
\\\\\\\\\\\\\\\\\\\\\\\\\\\\\\\\\\\\\\\\\\\\\\\\\\\\\\\\\\\\\\\\\\\\\\\\\\\\\\\\\\\\\\\\\\\\\\\\\\\\\\\\\\\\\\\\\\\\\\\\\\\\\\\\\\\\\\\\\\\\
As of verion 13.0 you can have HCbatchGUI create your avisynth script for you. If you want to create your own scripts thats okay to. HCbatchGUI will happily accept any avs file you create yourself.
\\\\\\\\\\\\\\\\\\\\\\\\\\\\\\\\\\\\\\\\\\\\\\\\\\\\\\\\\\\\\\\\\\\\\\\\\\\\\\\\\\\\\\\\\\\\\\\\\\\\\\\\\\\\\\\\\\\\\\\\\\\\\\\\\\\\\\\\\\\\
Open the Videohelp.com bitrate calculator. Put in the video length ( if more than one video then add up the time and put that figure into the calculator) and set the audio rate to what you will encode audio at (224 kbps is good for 2 channel audio). You now have your average bitrate to encode to (it is a good idea to use a slightly lower~like 25kbs less~ rate than calculated to allow for authoring overhead).
You are now ready to process the video and audio using HCbatchGUI.
First you need to set up a template for the encode. As of v13.1 the GUI has been updated so that you don't have to worry about duplicate or conflicting entries.
You can reuse the templates over and over. After you have created a few basic templates you should never have to do anything on this tab again. I personally use the same 4 templates over and over.
The most important settings for you to check are
Profile (I suggest best),
dc prec (9 is good for most),
autogop ( If unsure what to set leave it at default 12),
auto detect (for interlacing detection) ,
aspect ratio,
Matrix (i suggest mpeg).
SMP turns on MultiProcessor settings. Allows you to take advantage of multithreaded/cored processors. If you don't have a multicore processor then check NOSMP.
You can also save your bitrates to the template however I suggest to leave that line blank so that you can use this basic template for other projects with the same specs).
When you have finished making all your selections press "Generate Template"
You should now see your template pop up in the box below.
All that is left to do now is click "Save Template".
Next go to the first page.
Set your source directory (where your avs files are),
Target directory (where you will save your m2v video files),
And bitrate (if you didn't add that to the template).
If you didn't create your own avisynth script files then you must now choose your destination size (352x480 etc...) and click "Generate Avisynth Script". If you want to compensate for overscan you must first click the appropriate overscan box then choose your destination size (352x480 etc...) and click "Generate Avisynth Script". You can also add the Convolution3D video noise filter here. If you wish to add convolution3d you must check the appropriate box (progressive, interlaced TFF, interlaced BFF) first then make your size settings and generate your script.
Then click either "Open Template" (if you entered the bitrate on the front page) or "Open Template with Bitrates in INI File" (if you added the bitrate to your template).
Now if you want to do a pal to ntsc conversion you can go to the batchDGpulldown page. This is a pretty easy setting as all there is to set is the directory you want to save the converted files to and then select the fps conversion button ( in this case 25.00 --> 29.97).
Finally you need to set up the audio. Your AC3 output directory is already set to the same directory that your m2v video files will be saved to although you can change this to any directory you like. Next add dithers if needed (leave at zero if unsure). Your sampling rate will be resampled to 48k by ssrc for you automatically. Next select your AC3 bitrate. Next select whether this will be a 2 channel encode, Upmix from 2 channel to 5.1 channel, or a 5.1 channel encode. Finally all that is left is to go to the last page (Process log/Start process) and press the "Start Your Batch Process" button.
Your files will now be processed by HCenc, Wavi, ssrc, and aften. Throughout the process you will see your progress in the log window. When finished your log window will say exit. You can then author the encoded files to dvd with your favorite dvd authoring program. A good freeware authoring app is guifordvdauthor.

Admin- Admin
- Posts : 6
Join date : 2009-12-17 -

» Tips: How to watch the video while you are downloading?
» My personal free video creation software.
» My personal free video creation software.
Page 1 of 1
Permissions in this forum:
You cannot reply to topics in this forum
» Happy April Fools Day!!!
» Tips: How to watch the video while you are downloading?
» Good news! StreamTransport is updated to V 1.0.2.1559!
» My tool:StreamTransport.
» How to download with StreamTransport
» HCbatchGUI user guide ~ Batch process video and audio.
» My personal free video creation software.